Showing posts with label recipe. Show all posts

Wednesday, June 5, 2013

Sodium-Free Italian Dressing

Pin It


Since I have been in the process of losing weight the last couple months, my diet has changed extremely!  While how much sodium an item did not even phase me in the past, I noticed that I had to start monitoring it.  Once I lowered it, I started seeing the pounds fall consistently over the last month and a half as I stopped retaining as much water.  Take note, that watching my sodium is not the only thing I'm doing in addition to counting my calories and working out at the gym, but it's one of the major items for my successful weight loss.  * I am not giving out medical advice for your situation. *

Because I'm not eating a purchased dietary program's food, I am still able to eat the same foods I love but with caution.  I don't feel restricted or deprived by my food cravings for pizza, pasta, bread, or dessert.  Although, I must monitor and plan for certain allowances.

While one of my favorite foods is grilled chicken, I had to seriously find an alternative of my favorite Kraft Foods Zesty Italian dressing to fulfill my goal of 1500 mg/day for sodium and still eat other things!  I'm pretty stoked about this new recipe I came across but modified it for my dietary needs.  Now, I can eat my favorite grilled chicken using this as the marinade and still be within my limit.

If you'd like to join me in my new adventure, I'm using My Fitness Pal and my username is haymancm.  It'd be pretty cool to do this together! :)

Ingredients:
1/2 cup apple cider vinegar
1/2 cup oil
1-2 tsp Mrs. Dash Onion & Herb seasoning
1 tsp sugar

Directions:
Combine all ingredients, stirring until dissolved.  Store sealed in the fridge.  Use for your favorite salads or marinades.

Thursday, May 23, 2013

Grilled Chicken Alfredo

Pin It

Served some grilled chicken Alfredo to my family for dinner tonight; it's my boys' favorite!  However, it struck me by surprise when my DH not only had one serving of the pasta, but went back for more!  He has not been one to "like" my Alfredo.  It made me laugh inside & smile for sure!  This is all what's left for tomorrow's snack.

Ingredients:
1/2 stick butter
1 1/2 cups heavy whipping cream
1 cup shredded cheese (I used jack/cheddar)
1 cup milk
garlic powder to taste
16 oz cooked pasta
1 lb grilled chicken

Directions:
In a large skillet, melt the butter over med-med high heat.  Add your heavy cream and cheese, and bring to a low boil until thick.  Gradually, add the milk to thin it out some.  Season with garlic powder.  Toss with pasta and grilled chicken.  Sauce will thicken as it stands.


Saturday, January 26, 2013

Rich Chocolate Ice Cream

Pin It

Last summer I bought a Cuisinart ice cream maker.  I had only made a simple vanilla recipe, but tonight, I wanted to try a chocolate recipe.  It's definitely very rich, almost like a Dutch chocolate flavor.  The recipe is adapted from Cuisinart's recipe book.  It tastes really good with a dollop of peanut butter~!  It yields about 5 cups, 10 1/2 cup servings.

Ingredients:
3/4 cup cocoa powder
1/2 cup sugar
1/3 cup brown sugar
dash of salt
1 cup milk
2 cups heavy cream
1 tsp vanilla extract

Directions:
In a blender, combine the cocoa powder, sugar, brown sugar, salt, milk, heavy cream, and vanilla.  I used my Vitamix blender, & it only took less than 10 seconds before the mixture got super thick, like the consistency of pudding.  (I like this method better than mixing it together with a mixer, as the powder will go all over the place! :( )

Let sit in fridge for about an hour before spooning into Cuisinart's frozen freezer bowl, following the directions from the manufacturer.  It should be done about 15-20 minutes.  If you can wait and want a firmer texture, place ice cream in a freezer safe container with a lid for about 2 hours.  Enjoy!

Thursday, January 3, 2013

Thousand Island Dressing

Pin It
Putting aside ranch dressing for salad, my husband's favorite salad dressing growing up is Thousand Island.  But, shoot!  After 19 years of marriage, I've never really bought it at the store...I always bought ranch.  Recently, I bought some Thousand Island dressing.  And, uh-oh, we are almost out.  So, my husband challenged me to find a recipe for it.  This recipe is adapted from allrecipes.com.  What do you think?

Ingredients:
1/2 cup mayo
1/4 cup ketchup
2 tbs sweet pickle relish
dash of garlic powder

Mix all ingredients together and serve.

Saturday, December 22, 2012

Coconut Bonbons

Pin It

Well, I think I did it?!  I have never made this candy before.  My husband's favorite childhood candy are these Coconut Bonbons.  He says that it tastes just like the way his granny used to make them! :)  However, he prefers them with the nuts, but I do not.  You may add them, if you wish.  The recipe is adapted from Taste of Home.  I'm glad my adventurous experimental recipe paid off, as it brought a smile to his face... lol

Ingredients:
2 2/3 cup flaked coconut (almost a whole bag)
2/3 cup powdered sugar
14 oz can sweetened condensed milk
2 tbs butter
1/2 tsp vanilla
chocolate flavored almond bark candy coating
*or use melted chocolate chips

In a large mixing bowl, add coconut, powdered sugar, sweetened condensed milk, butter, and vanilla.  Place in the microwave to warm it up just a bit to stir easier.  The butter should melt on it's own as you mix it all together.

Line a cookie sheet with parchment paper, and drop small spoonfuls of the coconut mixture onto the paper.  Place in freezer or fridge until hardened.

Melt either your chocolate flavored almond bark candy coating or your chocolate chips in a shallow bowl.  Place the coconut balls into the chocolate & rescue with your fork, shaking off extra chocolate.  Or you can just drizzle chocolate over coconut balls on the liner.

Enjoy!


Monday, October 8, 2012

Starbucks Hot Chocolate

Pin It

Oh, geez!!!  It all started when I was at Costco (again) today and saw that they are selling these tin canisters for Starbucks Hot Chocolate.  I thought how special their hot chocolate must be to 1) be selling them in a tin canister for the holidays 2) offer them at Costco 3) Costco has a coupon for $2.90 off in their monthly coupon booklet.  

Anyone who knows me, knows that I don't do coffee.  I don't crave it, don't like the smell of it, and don't really like hot drinks.  But, I do love hot chocolate!  Who doesn't? Right?  So, I thought I might as well just Google to see if there was a recipe for this special hot chocolate online.  hmmmmm?  The recipe is adapted from Todd Wilbur's-Top Secret Recipes.  

Even though Colorado has already gotten some snow this last week, and it's gotten cold and windy outside, it's in the 70's this week, Hot Chocolate Season is approaching us!  Although, my oldest (teenager in the house!) would have hot chocolate every day, if he had it his way! lol  I am grateful that even though I just made some of the whip cream recipe over the weekend for another recipe, that it won't be going to waste.  This hot chocolate recipe finished up the rest of the whip cream!  Yay!  ...Now, I just need to make more whip cream to go with this hot chocolate.... Does it ever end???! lol


Ingredients:
1/4 cup water
2 tbs sugar
2 tbs cocoa powder
1 3/4 cup hot milk
1/2 tsp vanilla extract
whip cream or Cool Whip homemade

In a 2-cup measuring glass, add the water, sugar, and cocoa powder.  Heat in microwave for about 30 seconds and stir.  Then, stir in the milk and vanilla extract to the chocolate syrup and heat until desired warmness, 1-2 minutes in the microwave.

Divide the chocolate milk between 2 coffee mugs and garnish with whip cream.  ( I personally think the whip cream makes it even more creamier and more enjoyable!  mmmmm....) 

Sunday, October 7, 2012

Cream Cheese Chocolate Chip Cookies

Pin It

With cream cheese on sale for $1/each here in town, I've been stocking up.  As you know, I'm always looking for an amazing chocolate chip cookie recipe.  Not sure what kind of effect I'd get using cream cheese in a cookie recipe, I thought I'd give it a shot.  Why not!? Right?  They are very soft and chewy.  I like them a lot! ...And so does everyone else in my family....  I've made these cookies several times in just the last week! (oy.)  They definitely taste best when hot, right out of the oven, with chocolate oozing out of each bite.... mmmmmm.  The recipe is adapted from Bake or Break.

So, not only does my Dear Husband not want my beloved French Silk Pie for his birthday, but he wants these cookies and Chocolate Eclair Dessert instead! Wow.  What a change in plans!  He's always had French Silk Pie for his birthday, 'cept for that time back in '07 when we had a power outage from an ice storm for 3 days in December!  We had no heat, no electricity, no generator, but we did have a fireplace! I don't remember how we ate, or what we ate...our stove was not gas.  I remember buying overpriced luxurious wood at about 6 a.m. at Lowe's in place of regular firewood...they were out of firewood!  We all camped out in our family room with blankets, sleeping bags, pillows, stuffed animals, etc during those long 3 days, even Grandma stayed with us.  Pockets of our town had electricity, like only one in a whole neighborhood would have electricity, while everyone else would be in the dark for days.  Fortunately, we were not trapped in our neighborhood from downed trees or power lines.  I remember storing my refrigerated items, like milk for my little boys, outside in the cold...just to be safe! Ice Storm Pictures

Ingredients:
1 stick butter softened
8 oz cream cheese softened
1 cup sugar
1 cup brown sugar homemade
2 eggs
1 1/2 tsp vanilla
2 1/2 cups flour
1 tsp baking powder
1/2 tsp salt
12 oz chocolate chips

Preheat oven to 350 degrees.  Line your cookie sheets with parchment paper.

If you bake like me, in a large microwave-safe bowl, I soften the butter and the cream cheese in the microwave for about a minute.  Then, I added 2 cups of plain sugar with about a tablespoon of molasses.  ( I do this when I don't have any brown sugar made and don't feel on making any.)  Whip it all together with a mixer until nice and creamy.  Beat one egg at a time, mixing well after each egg.  Then, stir in the vanilla.  

Add the flour, baking powder, and salt.  Stir well.  Then, stir in the chocolate chips.  ( I always love to taste the batter....mmmm... the cream cheese tastes sooo good!)

Drop the dough by teaspoons on the parchment paper.  Bake in the oven for about 12-15 minutes.  12 Minutes normally works fine in my oven.

Saturday, October 6, 2012

Chocolate Eclair Dessert

Pin It


Does anyone else use Pinterest or Google to find new recipes using up items in their pantry, even items that are out-dated, aka expired?  A lot of times, I'm searching for new recipes to use up close-to-expiration items or past-expired-items, all because I like to stockpile!  I think I came across this recipe a few months ago and forgot about it.  I bought a big ole box of graham crackers from Costco a few months ago, and they didn't get used up before the expiration date 1-2 months out, of course! 

After making this recipe, I'm thrilled to be down a box of graham crackers after this recipe; I have one left to go! lol  It was really pretty easy to make.  The recipe is adapted from The Kitchen is My Playground.  My husband is trying to decide on if he wants this recipe to be his "Birthday Cake" or do his favorite French Silk Pie again.  I love that this recipe has a super-terrific fudgy coating...from scratch! mmmmmm  It's so rich and delicious!  I'm told I have to make this again!...I take this as a compliment! :)

Ingredients:
2 cups homemade Cool Whip recipe
1 5.9 oz box Jell-O vanilla instant pudding
2 1/2 cups milk
1 box of graham crackers
1/3 cup cocoa powder
1 cup sugar
1/4 cup milk
1/2 cup butter
1 tsp vanilla

In a medium mixing bowl prepare the homemade Cool Whip.  In another mixing bowl, mix together the pudding and milk with a mixer for 2 minutes.  Gently fold the Cool Whip into the prepared pudding until well combined.

In a 9x13 pan, lay out a layer of graham crackers.  Pour half the pudding mixture onto the graham crackers, top with another layer of crackers, and repeat.  Make sure that all the graham crackers are coated with the pudding.  Top with a final layer of graham crackers and set aside.

In a saucepan, heat the cocoa powder, sugar, and milk.  Stir until boiling.  Boil for 1 minute.  Remove from heat and let rest for 1 minute.  Add the butter and vanilla.  The chocolate will quickly get thicker as you stir just long enough to melt the butter.  Once the butter is melted and the frosting looks amazing, be proud of yourself!, pour on the 3rd layer of graham crackers.  Make sure the chocolate is as even as possible.  Refrigerate for about 3-4 hours, or until firm.  (My family couldn't wait for this process to be over!!!)

Saturday, September 29, 2012

Homemade Egg Rolls

Pin It

You know how you can do nothing but crave a certain type of food for weeks or even months at a time?!  Well, I've been craving nothing but Chinese so much that my DH doesn't want to have Chinese on our lunch dates anymore. :(  I was thrilled to see that Costco started selling some egg rolls in their stores!  But, with a family of 6, an 18 count box doesn't last very long!

Decided that I would venture out and make some of my own, why not, right?  I even ventured to make my own sweet & sour sauce to go with these versus paying $2+ for a bottle that would not last long at all! lol  I still do want to try to make my own egg roll wrappers....another time perhaps!  (I just wanna say that I've done it before!~)  The recipe is adapted from For the Love of Cooking.

Ingredients:
splash of oil
1 16 oz package of coleslaw mix
3 baby carrots shredded
1/2 cup diced onions
1 tsp powdered ginger
2 tbs soy sauce
1 tbs corn starch
1/4 cup water
15 egg roll wraps
1 egg beaten 
oil for frying

In a large saucepan, saute the coleslaw mix, carrots, and onions until softened.  If needed, add just a splash of water, if it's too dry.  Once cooked down, add the ginger and soy sauce and let simmer just a bit.  Once you have taste tested and approved the flavor and the texture of the veggies, in another small glass, mix well the corn starch and water, and pour onto the veggies and stir.  Immediately,  there should not be any liquid in the saucepan.  Let cool some.


Meanwhile lay out an egg roll wrap diagonally, apply some of the beaten egg on your finger or brush and smear on the top 3/4 of the wrap.  In the middle portion about a spoonful (about 2 tbs) of the veggies on the wrap.  Fold in the sides, then roll up from the bottom up.  The egg sealant will seal the wrap from separating while cooking.


Preheat a skillet of oil on about medium/medium-low, or it will splatter.  Gently place a folded egg roll in the oil and cook about 2-3 minutes per a side, or until golden brown.  Cool on paper towels.  Serve with sweet and sour sauce.  Recipe

Monday, September 24, 2012

Cream Cheese Banana Bread

Pin It

If you looked in my freezer, don't be surprised to find a large stash of frozen bananas!  Just like laundry or dishes may multiply, my bananas multiply!  I think I "waste" more bananas during the school year, than any other time of the year!  My boys will only eat a certain color of banana, yellow without much bruising/dark spots.  All the browned bananas get tossed into freezer bags for the freezer.  Does this happen to anyone else!?  While banana-flavored foods (like banana bread for example) are my least favorite, I gotta clear out my freezer and make room.  My kids, on the other hand, love, love, love banana bread!

The recipe is adapted from Sugar & Spice by Celeste.  While I added an extra 1/2 cup of bananas to get rid of a whole bag of frozen bananas, it tastes really good! .....The cream cheese must be the key ingredient???   I could not wait for it to cool to slice and neither could my boys!  Before I put it in the oven, the batter tasted, "Mmmmm."

This recipe appears to be a success, even my DH loves the taste; his favorite is the crust.  Meanwhile, Momma's doing the "Happy Dance" over here, even though half the recipe has already been eaten, there is still another half to go towards my 4 boys' lunches for tomorrow.  That's important!!!

Ingredients:
3/4 cup butter softened
8 oz cream cheese softened
2 cups sugar
2 eggs
3 cups flour
1/2 tsp baking powder
1/2 tsp baking soda
1/2 tsp salt
1 1/2 - 2 cups mashed bananas
1/2 tsp lemon juice
1/2 tsp vanilla

Directions:
Preheat oven to 350 degrees.  Grease 2 loaf pans with a nonstick cooking spray coated with flour.

Slightly melt the butter and cream cheese in the microwave for about 30 seconds or have it already softened.  Cream the sugar with the butter and cream cheese until light and fluffy.  Beat one egg at a time until well blended.

Add the flour, baking powder, baking soda, and salt, stirring well.  Then, add the bananas, lemon juice, and extract.  Divide the batter between the two loaf pans.

Bake in the preheated oven for 50 minutes to an hour.  Enjoy!


Saturday, September 22, 2012

Homemade Pancake Syrup

Pin It

Several years ago, I realized what was needed to make my own syrup for pancakes.  Even though it's been a while since I last made a batch, it melted the hearts of my boys all the same, "Mmmmmmm."

Ingredients:
1 cup boiling water
2 cups sugar
1/2 tsp maple extract

In a medium size bowl, boil the water.  It must be really hot, or it won't work.  Pour in the sugar, and stir until clear, about 2 minutes (reminds me of making Jello!)  Then, add the maple extract & stir until well combined.  Serve over your favorite pancakes or waffles.


Tuesday, August 28, 2012

Chicken Enchilada Pie

Pin It


Here is a spinoff from a family favorite, Frito Pie, growing up.  The recipe is inspired from Linda's Low Carb Mexican Chicken recipe.  Now that school has started with after school activities, I needed a quick recipe to put together from items I already had in the freezer.

Ingredients:
2 cups cooked rice
2 cups cooked chicken breast pieces
1 can enchilada sauce or homemade
4 oz can green chilies
Fritos corn chips
shredded cheese
shredded lettuce
diced tomatoes
sour cream

Directions:
Heat together the rice, chicken, sauce, and green chilies until warm.  I used a crockpot to put mine together.

In a 9x13 dish, layer the chips, rice mixture, cheese.  Place in microwave for about a minute, or until cheese is slightly melted.  Top with lettuce, tomatoes, and a dollop of sour cream for each serving.


Peanut-Free Granola Bars

Pin It

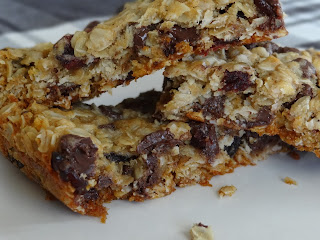
With a peanut ban in the classrooms at school, finding a peanut-free granola bar recipe required a little more digging than normal!  I was delighted to have found this similar recipe from The Crafting Chicks.   It is moist & chewy.  My 4 boys begged me to let them have their portion for tomorrow's lunch now!  So, I gave in & decided to just make another batch in the late night, as I didn't have enough portioned for tomorrow's lunch.  I'm able to use up the big bag of dried cranberries getting ready to expire; they don't even notice they were in the bars!  (Phew!)

Ingredients:
1 stick melted butter
1/2 cup brown sugar homemade
1/4 cup oil
1/2 cup honey
1 tsp vanilla
3 cups rolled oats
1 cup flour
1 tsp baking soda
1/2 tsp salt
1/2-1 cup chocolate chips
1/2-1 cup dried fruit raisins or cranberries

Directions:
Preheat oven to 325.  Spray a 9x13 pan with a nonstick cooking spray.

In a large mixing bowl, add all the ingredients in order & mix well.  I found that if I portion my 1/2 cup with the 1/4 cup of oil, the honey comes out much easier---not as sticky!

Spread the mixture in the 9x13 pan, pressing down evenly with a sheet wax paper.

Bake for 20 minutes.  Do not cut or serve until completely cooled; it will fall apart.

**In the picture shown, I added a full cup each of the cranberries and chocolate chips.

Thursday, August 23, 2012

Moist Chocolate Sheet Cake

Pin It

After school I gave two of my boys a choice of three different goodies to make for them...it was one of those kind of days a momma has to cheer up her kiddos.  They chose this chocolate sheet cake.  It is very moist and delicious!  One of my older boys said that he had to get a glass of milk to go with the cake.  That all the "good" chocolate cakes require milk to go with it.  All he could say once he had a bite was, "MMMMMMMMM."  (He is one of my picky eaters when it comes to chocolate cake.) lol  I packed a piece in their lunches with wax paper around it.  They all ate their cake on the way to school! That's one way to keep the other kids from wanting some!!! lol

The recipe is adapted from The Pioneer Woman.  I was impressed with how quickly it all seemed to be put together.  I love that the frosting doesn't taste like powdered sugar.

Ingredients:
2 sticks butter
4 tbs heaping cocoa
1 cup water
2 cups flour
2 cups sugar
1/4 tsp salt
1/2 cup milk
1/2 tsp lemon juice
2 eggs beaten
1 tsp baking soda
1 tsp vanilla

Preheat oven to 350 degrees.  In a medium saucepan, bring to boil butter, cocoa, and water, stirring well.  Boil for 30 seconds and remove from heat.

In a large mixing bowl, add the flour, sugar, and salt.  Pour the chocolate sauce into the bowl and mix well.  Try to get as much of the flour lumps out as much as possible.

In another small bowl, mix together the milk, lemon juice, beaten eggs, baking soda, and vanilla.  The chocolate mixture should be cool to the touch by now.  Add the liquid and mix well.

Spray an 18x13 sheet cake pan with a nonstick cooking spray.  Pour the batter into the pan, spreading it out as evenly as possible.  Bake for about 20-25 minutes, test with a toothpick for doneness.

While the cake is baking, you can prepare the frosting.  


Frosting:
3/4 cup butter
3 tbs cocoa
2 1/2 cups powdered sugar
3 tbs milk
1 tsp vanilla

In a saucepan (I reused the same to make the batter), melt the butter and cocoa.  Remove from heat.  Gradually, add the powdered sugar, milk and vanilla, stirring well between intervals to get to a smooth consistency.  

After the cake has cooled for about 5 minutes, spread the frosting on the cake.  The frosting will harden as it cools on the cake.  Garnish with sprinkles or chopped nuts.

Sunday, July 15, 2012

BBQ Chicken Pizza

Pin It

As hesitant as DH was to me making this pizza, I.loved.it!  I think my favorite part of it was the cilantro added as a garnish on the BBQ Chicken Pizza.  (I love cilantro in the first place...just was not sure how it would be with BBQ.)  I really didn't want to open up a jar of marinara for the pizzas made tonight, but ended up anyways for variety---just in case not everyone in the family liked it.  However, there were only a couple slices of this for leftovers.  The recipe is adapted from Food.com.


Ingredients:
pizza dough or homemade
1/4 - 1/2 cup honey BBQ sauce
1-2 cups shredded mozzarella cheese
cooked chicken thinly sliced
cilantro chopped (optional)

Directions:
Preheat oven to 450 degrees, or as prescribed on the packaging for the pizza dough.  Coat the pizza pan with a layer of canola oil, and spread the dough in the pan.  Smear the sauce on the dough and layer the pizza with the cheese and chicken.  (The chicken I used was cooked in a sweet BBQ sauce.)  Sprinkle additional cheese over the chicken, if preferred.

Bake for about 15-20 minutes.  When pizza is done, remove from oven, and sprinkle the pizza with cilantro as a garnish, if preferred.  

...Since I don't have a pizza pan, I used a 9x13 pan.  Once the pizza was done baking, I was able to transfer it to a cookie sheet to cut and serve easier.

...If you are using plain chicken, toss lightly in some BBQ sauce before placing on pizza.


Saturday, July 14, 2012

Bread Machine Pizza Dough

Pin It

Normally, my DH has always made the homemade pizza in our house.  But, I just found this recipe earlier this week.  He thought it tasted really good and "homemade," far better than the french bread pizza I made earlier this week.   Either way, it's a win-win!  The recipe is adapted from Salad in a Jar.  There were very little leftovers with my family of six; bummer!

Ingredients:
1 cup warm water
1 tsp sugar
1 tsp salt
4 tsp olive oil
2 tsp honey
3 cups flour
2 1/4 tsp yeast (1 pkg)

Directions:
In the bread machine, add the ingredients in order, and select the dough cycle option.  Once the dough has completed rising, punch it down to get rid of any air bubbles.  Meanwhile, preheat the oven to 450 degrees, and spray 2 9x13 pans or pizza pans with some canola oil. (I don't have a pizza pan; the 9x13 pan worked wonderfully.)

When ready, pull the dough out of the machine, and separate into two sections.  Roll out the dough to the desired shape.  If the dough is too elastic, let it rest a minute, and relax.  Place in desired pan, and spray dough with some more of the canola oil.  Then, apply a thin layer of sauce, cheese, and toppings.


Bake in oven for about 15-20 minutes, or more if too much sauce was applied to dough.  ( I checked mine at 10 minutes to check for doneness.)  Slice with a pizza cutter and serve.  (I did not have a problem taking the pizza out of the 9x13 pan and placing on a cookie sheet for easier cutting.)


Thursday, July 12, 2012

Homemade Cool Whip

Pin It

As a kid, I remember eating Cool Whip out of the container.  It tasted so good and was very addicting, especially when no one (I don't think, especially my mom) knew....I could be wrong...she never said anything! lol  After realizing all the different things I can make with heavy whipping cream, I searched to find how to make my own Cool Whip a few months ago.  Unfortunately, I can't remember who to give credit to for this recipe.

Ingredients:
2 cups heavy whipping cream
1/2 cup powdered sugar or more to taste
2 tsp vanilla

It is best to start off with cold beaters and mixing bowl.  I put mine in the freezer for a about 15 minutes before beginning.  Pour the cream into a medium size bowl and whip the heavy cream for about 3-5 minutes on high with mixer, until thick and peaks start forming.   I immediately stopped right before 5 minutes, as I didn't want to make butter!


Then, gently stir in the powdered sugar and vanilla.  It should resemble the texture of Cool Whip, light and fluffy.  The recipe yields about 3 cups.  I had enough (2 cups) called for a  recipe & some extra on the side to do something with for a different recipe.

Sunday, July 8, 2012

Hash Brown Potato Casserole

Pin It

After trying this Hash Brown Potato Casserole different ways to make it "more" frugal, it didn't turn out quite the way my DH loves.  My mom would always make this casserole at all the holiday meals for years, and my DH always loved eating it! (Me too!)  So, I broke down, setting aside my frugal alternatives, and made it as she makes it.   This is indeed a family favorite!

Ingredients:
2 cans cream of mushroom soup
16 oz sour cream
2 cups shredded cheese
6 cups frozen shredded potatoes

Preheat oven to 350 degrees.  Spray a 9x13 pan with a nonstick cooking spray.

In a large mixing bowl, combine the soup, sour cream, and shredded cheese until well mixed.  Then, stir in the shredded potatoes and place into the 9x13 pan.

Bake for about 45-60 minutes, or until hot.

Garnish with chives or bacon bits as an option, or just plain is good as well.

Homemade Nesquik

Pin It

Seriously, it's almost midnight, and I found a new recipe to share with y'all.  Funny how you can be on a hunt for something, and you find yourself on a rabbit trail looking up something else!  So, in the midst of trying to find a recipe for something chocolaty, I came across the recipe for Homemade Nesquik, thanks to Sugar Bananas.

What I originally wanted to try has the ingredient for this chocolate powder, but shoot!  I haven't bought any Nesquik in years!  I thought that surely there's a recipe online for a chocolate powder for an easy way to make chocolate milk!  shhhh!  My four boys don't know about it yet!  Uh-oh!  I can see milk being added to my grocery list for later this week!

Good thing that I have a stash of cocoa powder in my pantry!  I have a feeling my oldest will be making this quite a bit on his own, without me knowing it! lol  Therefore, I'll be making a larger batch of this recipe in the nearer future!  Meanwhile, here is a smaller batch for you to try yourself.  Sounds too easy!  (It is!) Now, you can save more money on your groceries, and your kids will love the taste! ....I've already had two glasses tonight! :o

Ingredients:
1/3 cup cocoa powder
2/3 cup sugar
dash of salt

Combine ingredients & shake in a covered container.  Use 2 heaping teaspoons (depending on chocolate preference) for an individual serving (8 oz) of milk.  But, to dissolve the powder the best, add just a bit of hot water and stir.  Then, fill the rest of the glass with milk.

Saturday, May 5, 2012

Crescent Roll Cinnamon Rolls

Pin It
(Look at my friend's photo using this recipe!  ((((gush!!!))) I love it!  To make her's, she use the whole recipe for the crescent rolls, & then cut into 1/2" sections, yielding 2 cake pans of yummy delicious cinnamon rolls!  Check out her blog, Simplify Mommyhood.)

After making another batch of dough from the homemade crescent rolls recipe yesterday, I was stuck with what to do with them!  I ended up making two batches of the Cinnamon Bars for a Cinco de Mayo celebration at my kid's school earlier this week with a batch of the dough, but I was originally planning to make 4 batches of the bars.  I felt like all I did last week was cook Mexican and did not want to make anything today!  But, when I saw this recipe from Iowa Girl Eats, I was instantly motivated to get back into the kitchen to "wow" my family!  She was right about making more than one batch of these suckers!  ...wow... they are sooo good!


The recipe was so awesome and quick!  I loved giving my untouched mini muffin pans something to do with this recipe!  The dough from the homemade crescent rolls could easily make 4 batches (about 48) miniature cinnamon roll bites.  I only made about 36 rolls.  I will use the other 1/4 loaf of dough for something else...maybe more cinnamon roll bites tomorrow????! 

Ingredients:
1/4 homemade crescent roll dough or 1 tube of refrigerated crescent rolls
2 tbs melted butter
1-2 tbs brown sugar
cinnamon/sugar mixture (1/4 cup sugar + 2 tsp cinnamon)

Directions:
Preheat oven to 375 degrees.  Spray your miniature muffin pans with a nonstick cooking spray.

Roll out the dough on a floured surface to about 9"x13".  Smear the butter over the dough (including the edges), sprinkle the brown sugar and cinnamon/sugar mixture over the butter.  Gently roll the dough up.  With kitchen shears, cut the dough into about 1/2" segments and place into the muffin pan.  This should yield you about 12 miniature cinnamon roll bites.

Bake in the oven for about 8 minutes.  Let cool on a plate and drizzle with your favorite icing.


Related Posts Plugin for WordPress, Blogger...